Owl Practice has full supervisor functionality. Supervisors can be added to both Solo and Group user accounts. Owl's supervisor feature includes:
- Customizable supervisors, you can set up as many or as few as you need!
- The ability to list your supervisor on invoices and receipts.
- The ability to include your supervisor's signature on your invoices and receipts.
- The ability to have supervisors review and sign session notes through direct access to your Owl account!
- A Workflow tool for the supervisor, to help them know exactly what notes are ready to review.
This guide will review the details of setting up and using multiple supervisors in your Owl account.
There are three elements to successfully using the Multiple Supervisors feature:
- Setting up each Therapist profile
- Assigning Supervisors on a client level
- Scheduling the correct Supervisor for each session.
When you are entering this information, you must go in the order: Therapist Profile, Client Account, and finally, Session Scheduling.
Step One: Setting up the Therapist Profile
If you are going to use supervisors in your practice, they must always first be set up on the Therapist Profile. Only a practice owner can complete these steps.
- Head to Settings > Therapists.
- Find the therapist for whom you are setting up the Supervisor.
- Click the checkbox next to their name, and click Edit in the green edit bar that appears at the top of the list.
- The option to set the Primary Supervisor is directly below the Therapist Grade, on the left side of the window.
- Use the drop down menu to select the Primary Supervisor for this therapist.
- Note - Each supervisor must be set up with their own Therapist Profile and be marked as Active to appear in the supervisor drop down.
- Once you have entered the Primary Supervisor, you can now set up your Additional Supervisor. Click the blue Add Supervisor button that is directly below the Primary Supervisor dropdown menu.
- Here, you will have the same options for therapist profiles to select as when you set the Primary Supervisor.
- If you enter the incorrect name, you can use the trashcan icon next to their name to clear the field. You can also use this trashcan icon once the supervisee no longer needs to be supervised.
- If this therapist needs to have their Supervisors sign their session notes, be sure to click the Require Supervisor Signature checkbox. Once the supervisee signs their notes, they will appear in the Supervisor's workflow to review and sign.
- If the supervisor must be included on financial documents (invoices, receipts, and account summaries), click the Show Supervisor checkbox under the Invoices and Receipts section of the Therapist Profile.
- Make sure you click the green Update Therapist button to save your work and apply your changes.
That's it! You can now move on to setting up the client account with the correct supervisor.
Step Two: Adding the Correct Supervisor to each Client Account
Before the release of Multiple Supervisors, Owl automatically assumed that if a therapist had a supervisor, that supervisor was responsible for every client the therapist saw. This meant that when you added a client and specified the Primary Therapist, Owl automatically assumed that the supervisor for that client was the singular supervisor set on the Therapist Profile.
Now, you will need to not only assign a Primary Therapist to each client, you will also need to assign a Primary Supervisor.
This must be done for every client whom this Therapist sees in order to ensure the correct supervisor is listed.
This step will review how to ensure the correct supervisor is assigned to each client.
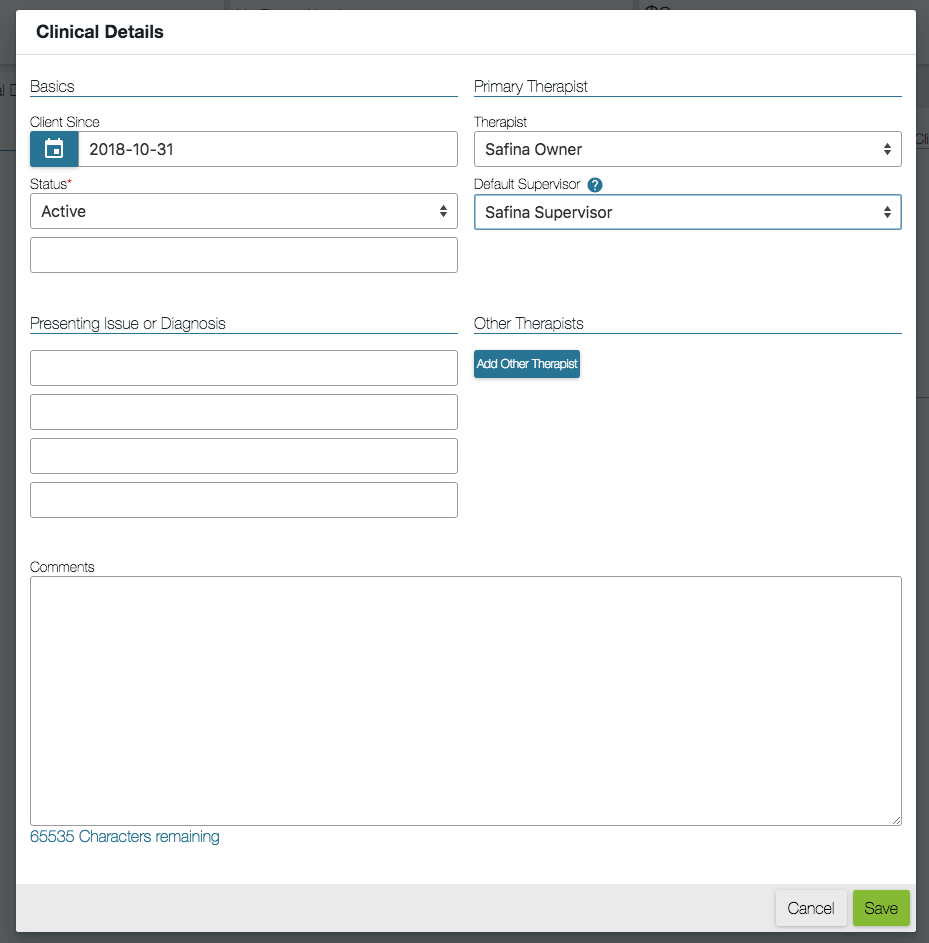
- Head to the Client Account > Contact & Clinical.
- Click Clinical Details.
- Click on the Default Supervisor Field to open the dropdown, which will display all of the supervisors you assigned to this therapist in Step One.
- Select the correct supervisor.
- Hit the green Save button to update your work.
- Once you have done that, the Client Account will reflect not only the Primary Therapist (as it did before the launch of Multiple Supervisors), but also the Primary Supervisor.
- Note - if you have more than one therapist and the Secondary or Tertiary Therapist also has a supervisor, you can add them on under the Other Therapist section of the Clinical Details form. There is no limit to how many supervisors can be assigned to each Client.

Step Three: Scheduling Appointments with Supervisors
Once you have configured the Therapist Profile and the Client Account, you will be able to schedule appointments for this client with the correct therapist and supervisor!
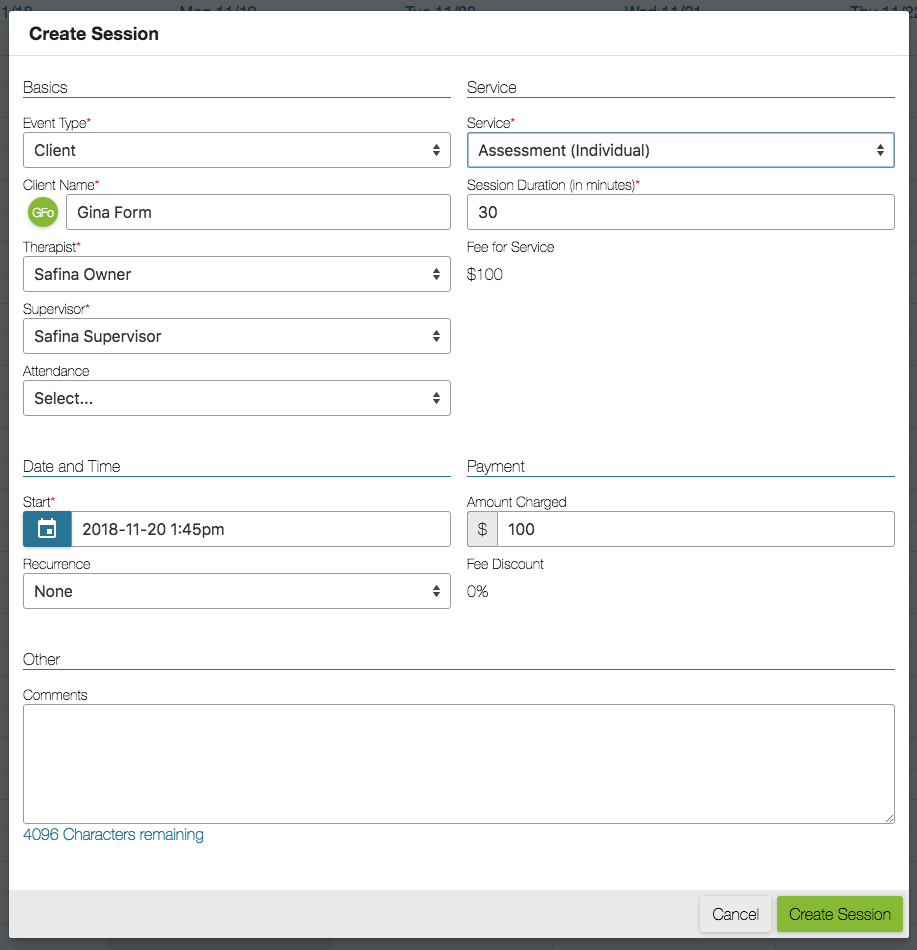
- Head to the Calendar.
- Select where you want to book a session, and enter in the client name as per usual.
- Once you enter the client name, you can select the Therapist.
- Once you select the therapist, you must also select a supervisor. Owl will automatically default to the supervisor you set on the Client Account. You can set the session to "No Supervisor," if need be.
- If you are using another supervisor, you can select them from the Supervisor Dropdown.
- Continue scheduling the rest of the session as per normal.

That is the final step! Now, the session will be scheduled with the correct therapist and supervisor. If you have opted to include the supervisor's information on the invoices and receipts, it will be directly below the header. If you have opted to have the supervisor sign session notes, once the therapist completes the note and signs it, it will appear in the supervisor's Workflow to review and sign.