
Creating a Session Note
To give you the most flexible workflow, there are three different places in Owl where you can write your session notes:
- The Calendar view
- The Client account view
- The Workflow view
From the Calendar view
From the Calendar view select the scheduled session. This opens a Session Overview window. From here, select Create Note.

From the Client Account view
- Select Clients, then select the Client Account and finally select the View button.

- Open the Sessions & Notes tab. This will display a full list of sessions the client has been scheduled for.
- Click on the Create Note button next to the session for which you are writing the note, this button will be on the far right of your screen.

From the Workflow view
- Head to the Workflow. In the left management bar, select Documents, and then Notes. Here, you will see a list of every note up until today. Select the Create Note button next to the session for which you are writing the note.

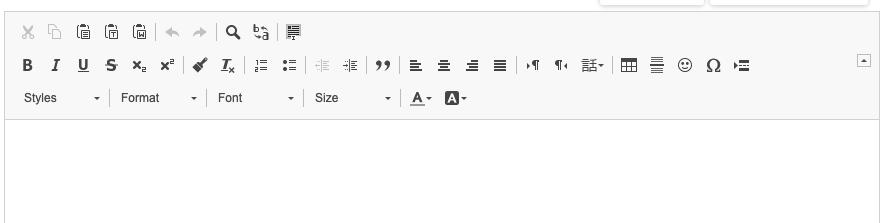
Using the Note Editor
When you open the Note Editor, you'll see a blank word processor-style canvas so you can start typing a freehand note right away if you would like. There are multiple style and formatting options available to use in the toolbar.
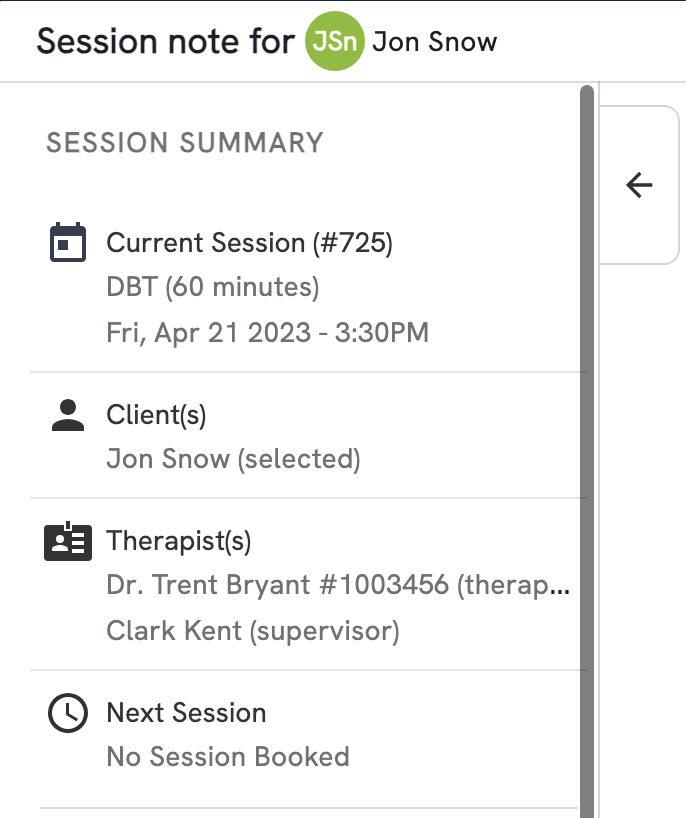
Along the left side you'll find the Session Summary, with details about the current session, service, client(s), therapist(s) and the client's next session if applicable. Use the arrow to collapse the sidebar for a more focused note-writing view
Importing a previous note into the current note
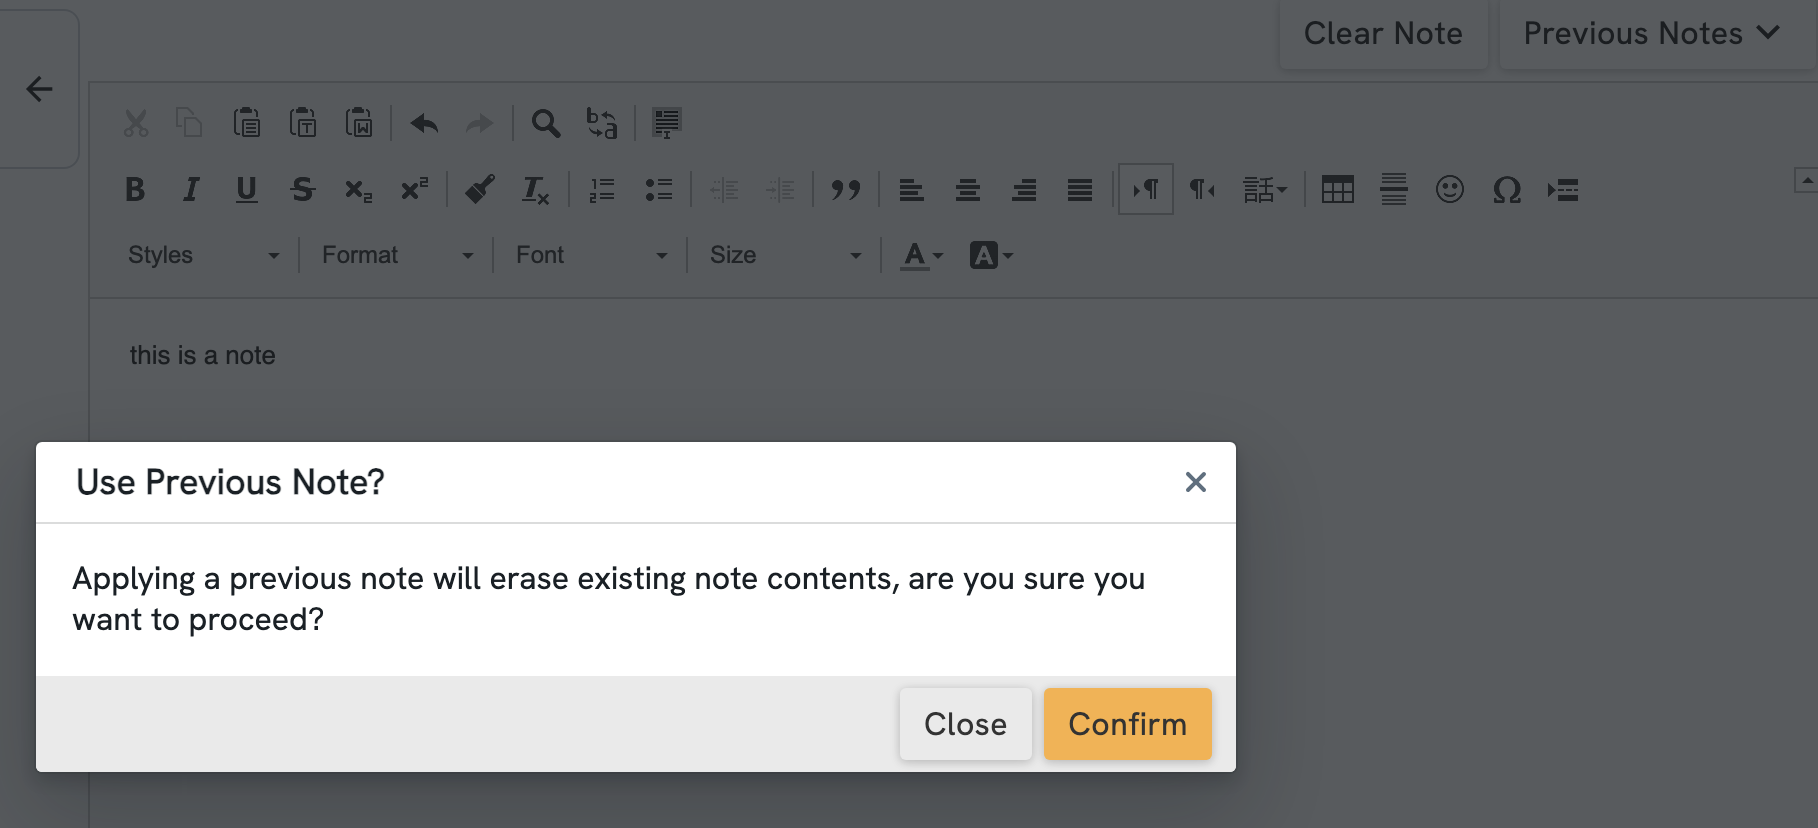
If you would prefer to use your previous note as a starting point, you'll find a dropdown menu in the top right corner that allows you to choose either the most recent note, or from a list of earlier sessions.
In the event of an error, use the "Clear Content" button to delete any content in the note template but maintain the formatting, or "Start Over" to erase the template and return to the blank text editor.

Important: Importing a previous note will clear any content you have written into the text box, so be sure to select the previous note as your first step.
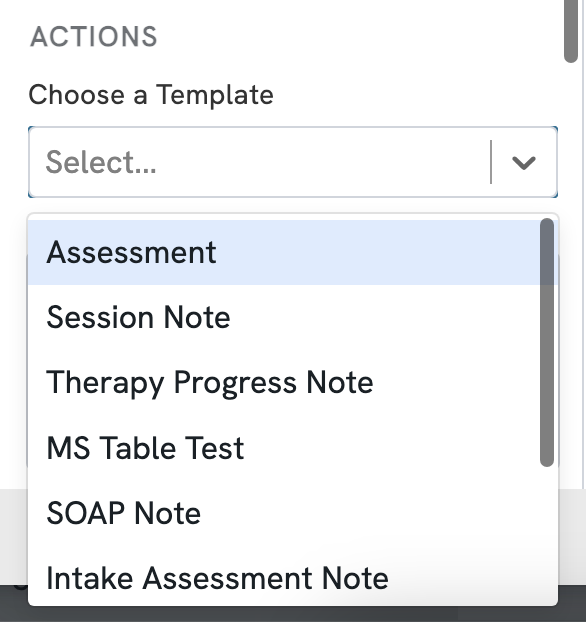
Applying a note template from your Practice Templates
Once your clinic has set up one or more templates under Manage > Notes > Practice Templates, you will be able to apply a template to your note from within the Actions section in the left sidebar.
When you add a template, you will have the option to append it to the start or end of what you have already written, or replace it entirely.
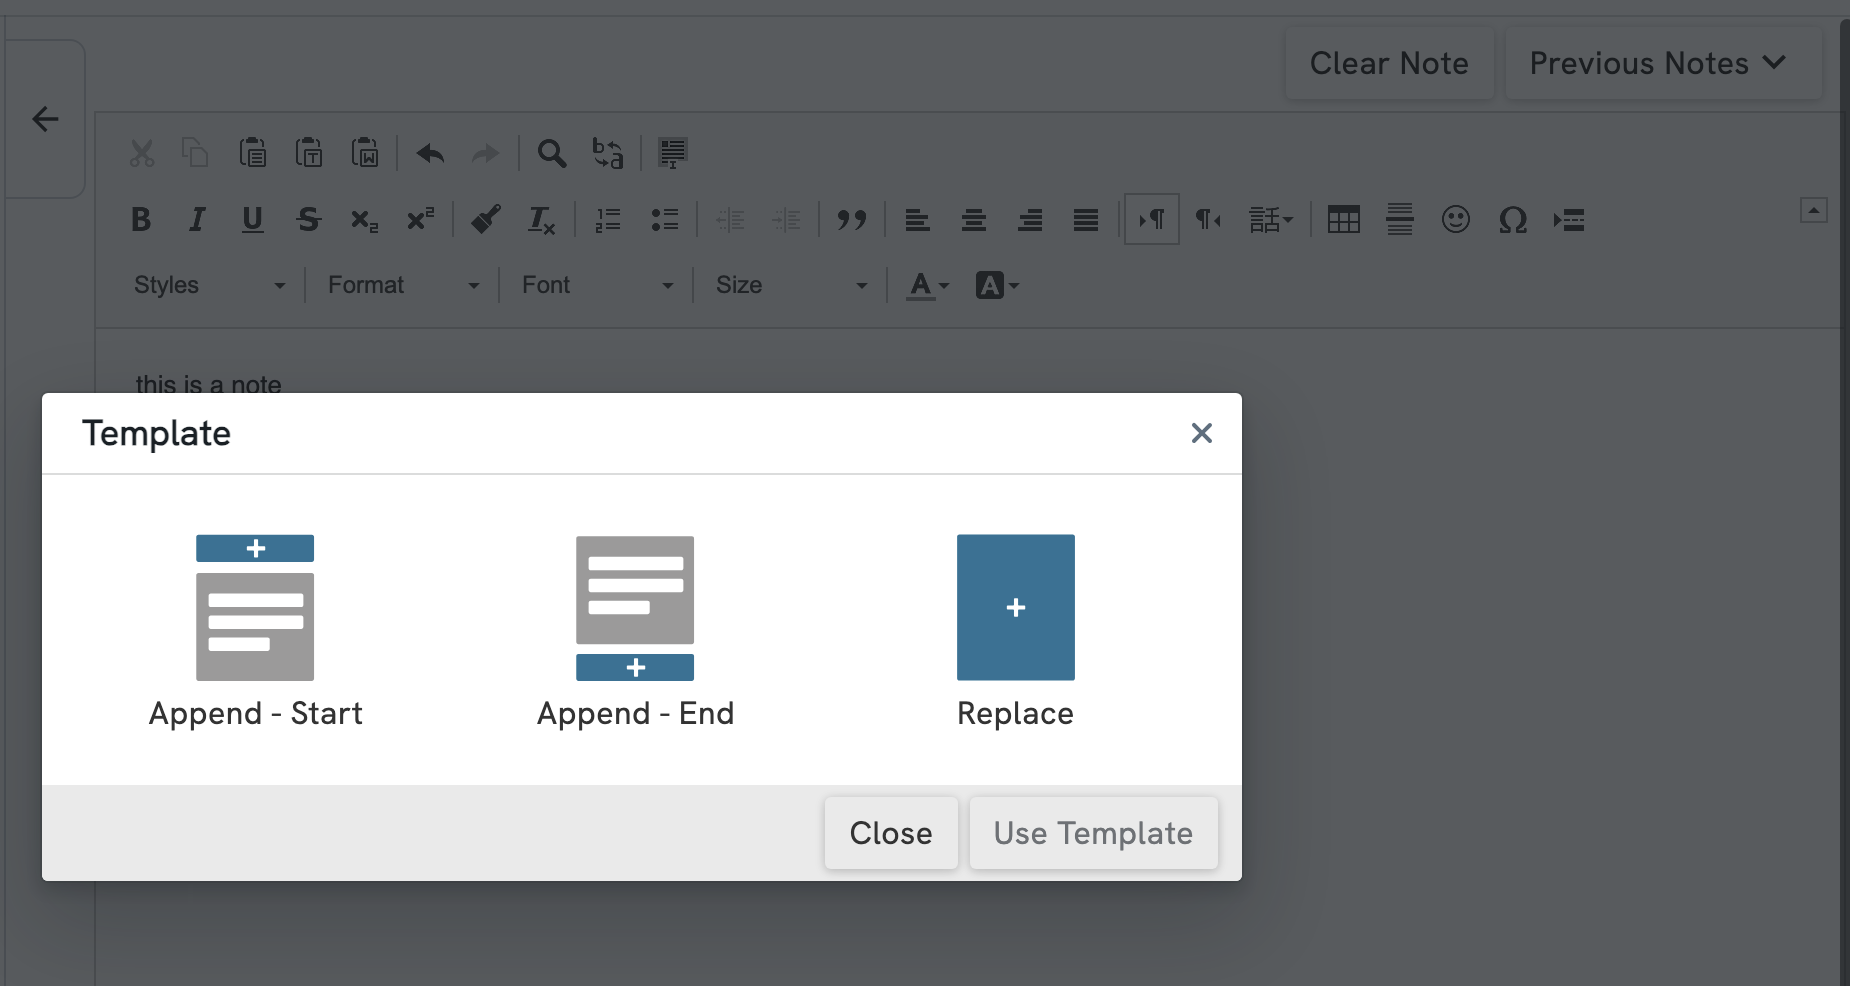
With Owl's new notes update, you now have the ability to apply multiple templates to a single note. Each time you choose a new template you'll be asked whether to append it at the start, end, or replace the existing content.
Associating documents to a session note
Document must be first uploaded to a client's record. If you have a document of any sort that must be associated to a specific session, head to the Note for that particular session. On the left-hand control panel, you will see an Associated Files section at the bottom.
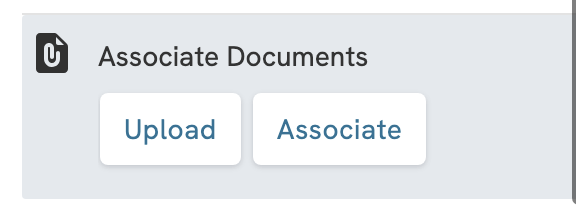
To upload a new file to the session, select Upload and find the file on your hard drive.
To associate an existing file to that session, you should first make sure that the file is uploaded to the client's account. If files exist, you'll be able to select it from the pull down menu. Once associated, this file will be available from the note, and the note will be available next to the file in the Documents tab.
Signing the note to finalize it
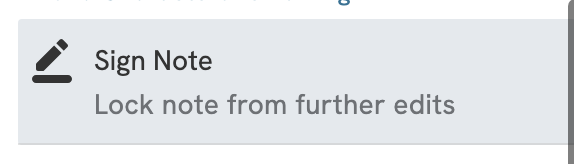
The only way to change a signed note would be to unsign it by selecting Unsign Note. A preview of the signature is also shown at the bottom of the window, along with the date and time of the signing.

Note: A note that has been signed cannot be edited by anyone, including a supervisor, even if a supervisor's signature is required. You must unsign a note to allow for edits.
Configuring signatures
To include a signature for a therapist, go to the Settings view and select Therapists. If you are in a group practice select the desired therapist account and select Edit.

From the Update Therapist menu, select Include Signature. Next, select Choose and Image under the Therapist Signature section to upload an image of your signature. A preview of the signature will appear in the section below. You can modify the Signature Size using the slider above the signature image. You can select Remove Signature to remove the signature at any time.

Notes Statuses
There are several note statuses that can be listed in the Notes overview.
Create Note: This means that a note hasn't been created and selecting this will take you to the Note Editor.
See Note: This means that a note has been created and selecting this will allow you to see the note.
Therapist Signed: This means that the therapist has signed the note but other signatures may be required such as a supervisor.
Supervisor Signed: This means that the supervisor has signed the note but other signatures may be required such as the therapist.
In Review: This means that the note is waiting on review from another required signatory such as a supervisor.
All Signed: This means that a note that requires both a supervisor and therapist signature has had all relevant parties signed off on the note.

Supervisor Sign Off
Assigning Supervisors to Therapists
To configure an account so that it requires a supervisor's signature to sign off on notes, first go to Settings, select the desired therapist and select Edit. From the Update Therapist menu, select the check box next to Require Supervisor Signature.

To add a specific therapist, select the desired supervisor from the drop down box under Primary Supervisor. You can also add additional supervisors by selecting Add Supervisor. Select Update Therapist when finished.

Signing off as a supervisor
To sign off on a note as a supervisor, select In Review when selecting a session from the Calendar view.

In the note, simply select Sign Note just like you would normally. The supervisor signature will be added below the assigned therapist's signature.

Deleting and Restoring Session Notes
To delete a session note, select the note from the Sessions & Notes section of the Clients view. Then select Delete from the buttons above the notes list.

You will receive a confirmation message in the top right that your session note has been deleted.

To restore any notes that have been deleted, navigate to the Deleted Notes tab and select Restore under Actions.

You will receive a confirmation message in the top right that your session note has been restored.

Exporting, Printing, or Downloading Session Notes
Occasionally, you may need to export your session notes off of Owl. There are two ways to do this:
- Exporting a single note
- Exporting a range of notes
Export a Single Note
To export and print a single note, you will first need to open the note. Once you do, you will see two options on the left: Download as PDF and Print Note.

If you select Download as a PDF you will get a notification of the status of your download in the upper right hand corner. Once the file is ready, the file will download using the settings in your browser governing file downloads.

If you select Print Note you will be presented with the default print behavior you have set up in your operating system. The printed note will look like this example below:

When you export or print a session note, it will contain your practice header, therapist information, and client information identical to your invoices and receipts. They will also contain:
- Session date
- Service
- Next Session
- Note Created
- Last Updated
- Attendees
- The Note
- Your Signature
Export a Range of Notes
To export a range of notes in bulk, first head to the Client Profile. Then, in the left side bar, select Client Export and a pop-up will open directing you to choose which sections you wish to include.

Be sure that Notes is selected. Select a Date Range and finally select Export.

You will receive a notification in the upper right hand side notifying you of a successful export. You will receive an email notification when the export is complete and available on the Exports page under Clients.

Handwritten Notes
The Handwritten Note feature allows you to attach notes written with a stylus to any Session or Non-Session Note.
To start a Handwritten Note, first open any Session or Non-Session Note. Handwritten Notes are added in addition to any Session or Non-Session Notes, so you'll need to open or create one of those notes first to then add a Handwritten Note that coincides with it. Once you have opened a note, select Add a Handwritten Note on the left hand side after saving the note as instructed.

The Handwritten Notes tool will open. From here you can write directly to the blank page using your mouse or a stylus. Tools to help you modify your note are on the left hand side, and include changing the Pen Size, Color, including Images and Erasing, Undoing, and Redoing actions. You can manually Add Pages from the bottom left. Select Save and Close to finish.

The options included in the tools menu are as follows:
- Pen: This is your writing tool for the note. You can adjust the size and color of the pen.
- Eraser: The eraser allows you to erase areas of the note you've written. Please note, clicking on it does not delete elements from the page, it simply allows you to erase areas of the note as needed.
- Delete: Using this tool you can select elements on the page to delete them. You can use this function on images and elements as well as on any pen marks you've made. Use this instead of the eraser tool when you want to fully remove content from the page.
- Move: If you click on a page element with this option selected, you can move, resize and rotate it.
- History: This function allows you to see the Note History; a list of all actions taken in the note since opening it. You can click on an action in the list to go back to that time in the note. It's an easy option you can use to undo multiple steps at once. Please note that this history is only kept for the duration of your current editing session - if you close the note, then reopen it at a later time, the session history will start fresh for that writing session.
- Revisions: While Session History is maintained only for that session, Revisions are permanently stored previous versions of your handwritten note. It's the same option you have with your Session and Non-Session Notes. You can select a previous version of the Handwritten Note and open it. Anytime you save a Handwritten Note or it is autosaved, a revision will be stored.
- Notepad: This option will turn the note writing area into a lined paper background to help you write handwritten notes as if being written on paper. You can show or hide the notepad background at any time by clicking this button.
- Image: This tool gives you two options: Upload an Image or Import a Saved Template.
- Undo/Redo: Select these two arrow buttons to go backwards and forwards through your Session History.
Using Templates and Images in Handwritten Notes
Templates allow you to easily use and reuse the same elements for all of your Handwritten Notes. For instance, if you have a standard chart or diagram you use to support specific session types, a template is very helpful because you don't have to recreate it with each new note.
To create a Handwritten Note template, go to Manage and then Handwritten Notes. In this area you can upload images to be used as templates, or create templates using the Handwritten Notes editor itself.

To do so, select the plus (+) button in the top right corner of the screen. You will see two options: Upload an Image or Import a Saved Template.

If you select Upload an Image, you'll be prompted to upload an image file from your device. After selecting an image, a preview of the image will be opened and you will be prompted to name your template. Name the template, select Save, and you will now have a version of that image stored that you can insert into your Handwritten Notes at any time by using the Import a Saved Template options when editing a note.
Please note that you can only upload image files (PNG, JPG) here, not file formats like PDF. The difference in uploading an image as a template instead of using the Upload an Image option when writing a Handwritten Note is that by uploading an image as a template, you now have a stored version of that image.
Alternatively, if you select Create a Template, the Handwritten Notes editor screen will open, and you will be prompted to craft a template anew. You are given the same Handwritten Notes tools for creating your own templates.
To use a template, select the Image option when editing a Handwritten Note (not to be confused with the Template button, which is for adding a lined paper background to your note). When you select the Image button, you will be presented with two options: Upload an Image or Import a Saved Template.

If you select Upload an Image, you will be prompted to upload an image file from your device. This will then place the image into your Handwritten Note. You can then use the Move tool to move, resize and rotate the image however you'd like. You can then annotate your images afterwards if you wish by using the Pen tool.
Managing Handwritten Notes
After you've written and saved a Handwritten Note, you can access it again at any time by opening the Session Note of its origin. Open the client's profile and select the note from the client's Sessions & Notes. You will see any Handwritten Notes in the sidebar of that Session Note. Selecting the dotted icon next to the name of the Handwritten Note in this sidebar gives you the option to View, Edit, Remove and Rename the Handwritten Note. Selecting View will allow you to view the Handwritten Note without any editing tools.

If you wish to print or export to PDF a Session Note that has a Handwritten Note associated to it, a new confirmation window will appear asking if you would like to include the Handwritten Note in the export or print out as well. Simply select Yes, Include Handwritten Notes to include them if needed.
