
Confidently manage your clients provided insurance coverage with our coverage and verification feature by accessing comprehensive plan information such as copays, deductibles, and deductible status directly from your client's profile.
Navigating to Client Coverage
- In the Clients section, select and open the client profile you are adding coverage for.
- Within the client profile, select on the Insurance section.
- Within Insurance, navigate to the Coverage tab.
Adding a Client's Insurance Coverage
Select the + button at the bottom right on the Coverage page to open the Add Coverage screen.

Don't see Add Coverage as an option? Ensure you have completed the Add Coverage requirements found below under Required Information for Add Coverage.
Adding Coverage Manually
First, you can upload in image of the client's insurance card by dragging an image of it or selecting Click to Upload in the appropriate box for the front and back side of the card. Then, you can select Scan & Auto-fill to fill out the Plan and Coverage insurance information.

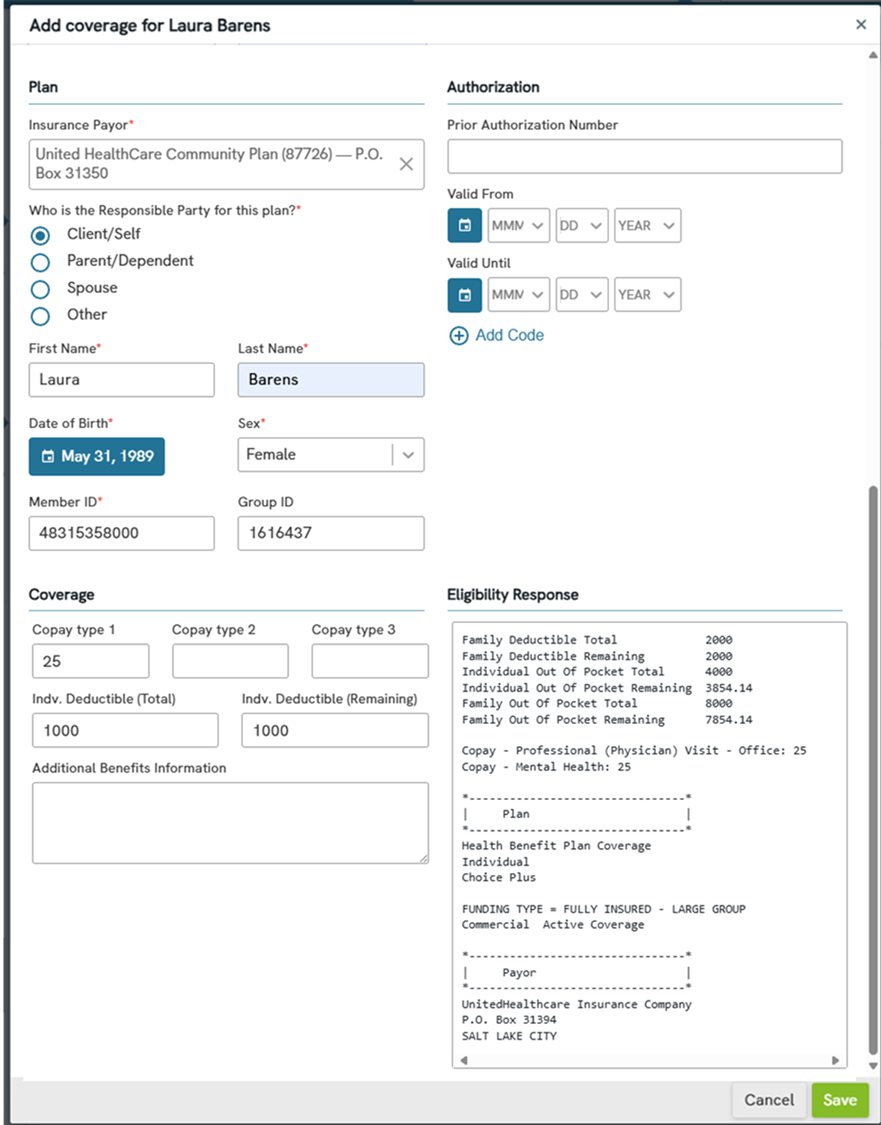
Alternatively, you can complete the Plan and Coverage sections of the form manually if necessary by selecting View Details. You will be presented with fields to input relevant information such as the Insurance Payer name, Member ID, and Group ID numbers.

If known in advance, you can fill out the details under the Coverage section of the form. Otherwise, this will be populated by the Verification of Benefits (VOB) feature.

Review the details in the form for accuracy, then select the Add Coverage button.
Note: Saving and closing the Client Coverage screen automatically triggers the Verification of Benefits (VOB) check to run through our clearinghouse and insurance company. Only save the profile when adding information, changing information, or intentionally running a verification of benefits. Verifying client benefit coverage includes a fee of $0.15/check.
Adding Coverage by sending a Request Form
Select the + button at the bottom right on the Coverage page and select Send form to client.

Enter the client's information in the provided fields and then select Send Form. Once the client fills out the received form, their coverage information should be populated within the app.
Viewing Client's Insurance Coverage
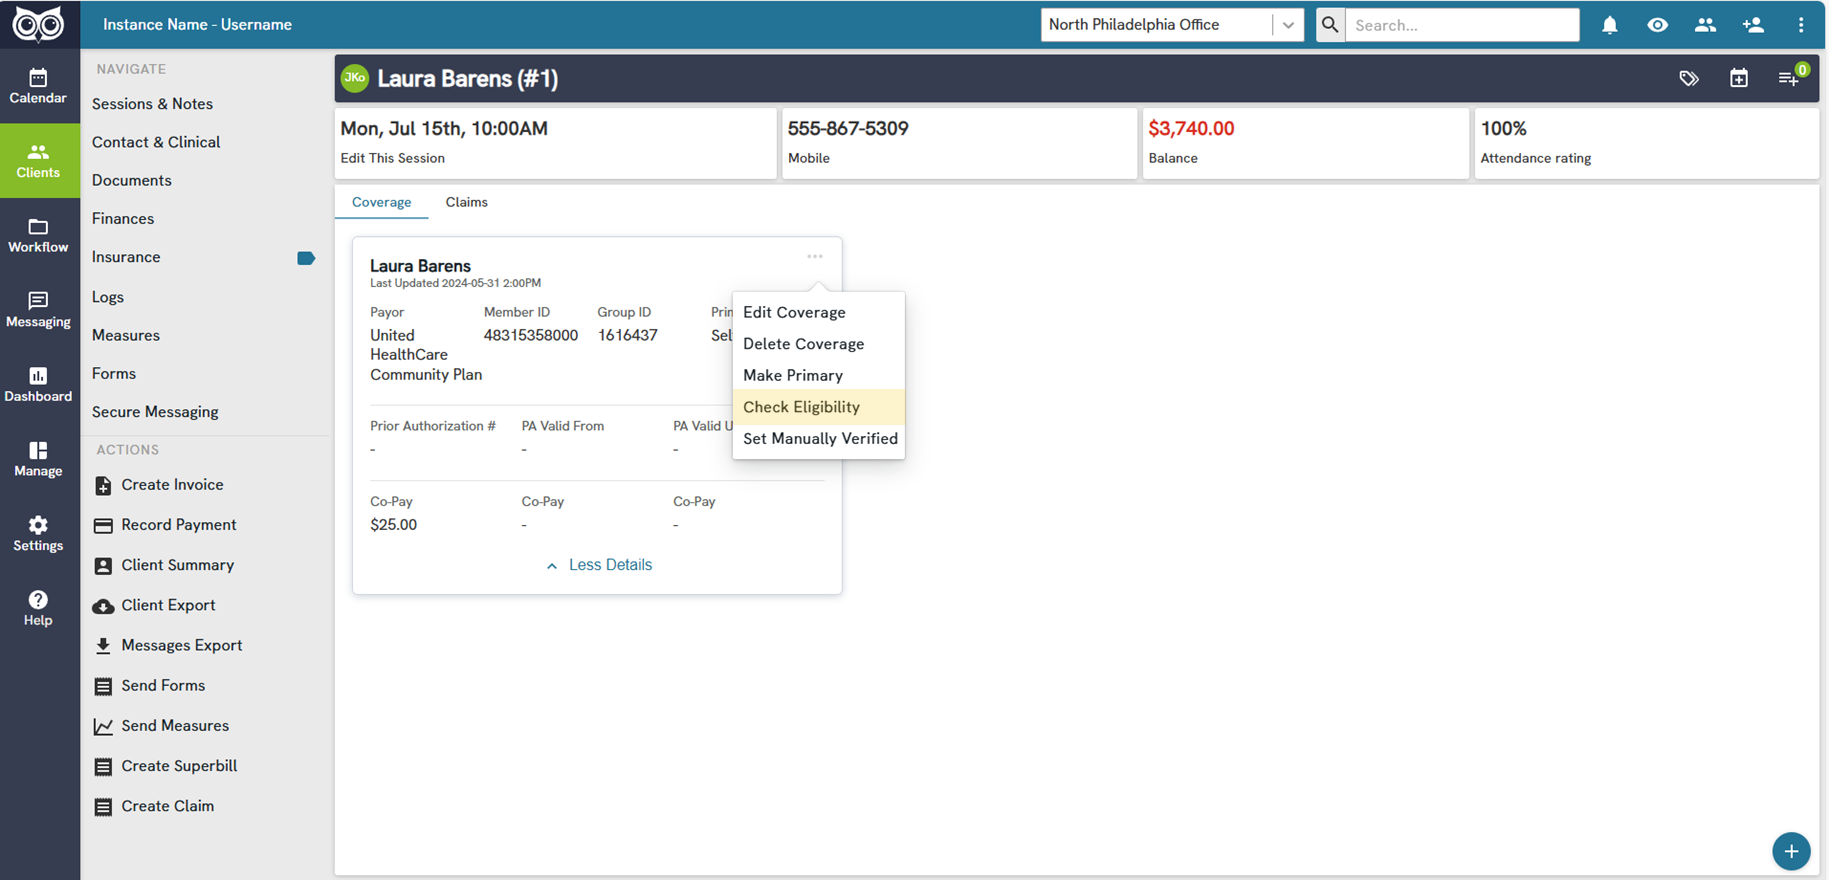
- Once added, the client's Coverage card will appear in the Client Profile Insurance Coverage screen where you initiated adding the coverage originally.
- You will be able to view coverage information from this screen without opening the detailed view, including the client's copay amount.

Running a Client's Verification of Benefits (VOB)
- When adding a client's insurance coverage for the first time, VOB is run automatically once the coverage is saved.
- You will see copay amounts directly from the Client Profile > Insurance > Coverage screen.
- To view the client's detailed real-time plan coverage details:
- Select on the three dots 'more actions' icon on the top right of the client's coverage card on your screen.
- From the dropdown, select the 'Edit Coverage' option. This opens the coverage detail screen.

- Scroll to the bottom of the coverage details and view the Coverage and Eligibility Response sections.
- Detailed copay, deductible, out-of-pocket, and additional client plan details that are real-time as of when the eligibility check was last run will be displayed.
- If only viewing these details, once done, select 'Cancel'.
- If looking to run verification of benefits again, select 'Save'.
Alternate Method to Run Client's Verification of Benefits (VOB)
- In addition to running the client's verification of benefits (VOB) when saving the profile, you can also run VOB from the coverage card 'more actions' button.
- Select the coverage card 'more actions' button, then select 'Check Eligibility'.
- This runs the verification of benefits (VOB) check without opening the detailed screen.
- Copays on the main card will be updated, if necessary.
- To view more detailed plan coverage details:
- Select on the three dots 'more actions' icon on the top right of the client's coverage card on your screen.
- Once done viewing these details, select 'Cancel'.
Required Information for Add Coverage
Before you can successfully add an insurance coverage for a client, certain fields must be completed or auto-populated by the system. If any required data is missing, incomplete, or invalid, the system will show the available action in a disabled state until you have completed the requirements.
- The below information must be present in Contacts & Clinical under the Clients view.
- Full Name
- Date of Birth
- Sex
- Address
- Phone Number
Note: If any of these prerequisites are missing, the Add Coverage action will not be available to you on the Coverage page under Insurance.
Adding Prior Authorizations.
You can manually add and log prior authorization information such as prior authorization numbers, CPT codes, vale date ranges, total units, and units used. To add prior authorizations, first select Prior Authorizations from the Insurance view.

Next, select the + in the bottom right hand corner.

Last, fill out the information including the Prior Authorization Number and CPT Code and then select Save.

Note: There is no limit to the number of PA numbers they can add. You can associate each PA number to multiple CPT codes using comma delimited formatting (e.g. 12345, 67890, etc.). The system does not automatically track or notify users of their prior authorization usage.